Unifying the User Experience: A Guide to Seamless Cross-Service Authentication
In today’s digital landscape, a fragmented user experience can be a significant barrier to engagement. For businesses operating multiple web services under a single brand, asking users to log in repeatedly is a relic of the past. The goal is a state of “login nirvana”: authenticate once, and gain seamless, secure access everywhere.
This guide details the journey of architecting such a system for HolidayLandmark.com, a digital platform with a diverse technology stack: a main dashboard, two event platforms, a blog, and a forum, all operating under one domain but with separate databases and codebases.
The Challenge: A Disjointed Ecosystem
The HolidayLandmark platform consists of five distinct services:
- HolidayLandmark.com: The main dashboard (Laravel)
- /trips: A trip management system (Eventmie Laravel)
- /events: An event management system (Eventmie Laravel)
- /blogs: A content blog (WordPress)
- /forum: A community forum (Flarum Laravel)
The core requirement was clear: when a user logs into any of these services, they should be automatically and seamlessly logged into all of them. The initial idea of a standard Single Sign-On (SSO) system involving redirects was refined to meet a more sophisticated goal: each service must retain its own unique login page, and the authentication process must happen without any visible redirection to a central login page.
The Solution: API-Driven Centralized Authentication
The optimal architecture to meet these requirements is an API-driven, centralized authentication system that leverages a shared domain cookie. This approach is modern, secure, and provides the most seamless user experience possible.
Here’s the high-level strategy:
- Central Identity Provider (IdP): The main
HolidayLandmark.comdashboard acts as the single, authoritative source for user credentials. It manages passwords and user data but does not handle user-facing login redirects from other services. - API-First Authentication: Instead of redirects, each service’s login form communicates directly with the IdP’s secure API using JavaScript. This happens behind the scenes, instantly.
- Shared Domain Cookie: Upon successful authentication via the API, the IdP sets a secure session cookie on the root domain (
.holidaylandmark.com). This cookie is the master key, accessible to all other services on the domain.
The Seamless Login Flow
This diagram illustrates the process, which is completely invisible to the user after their initial login.
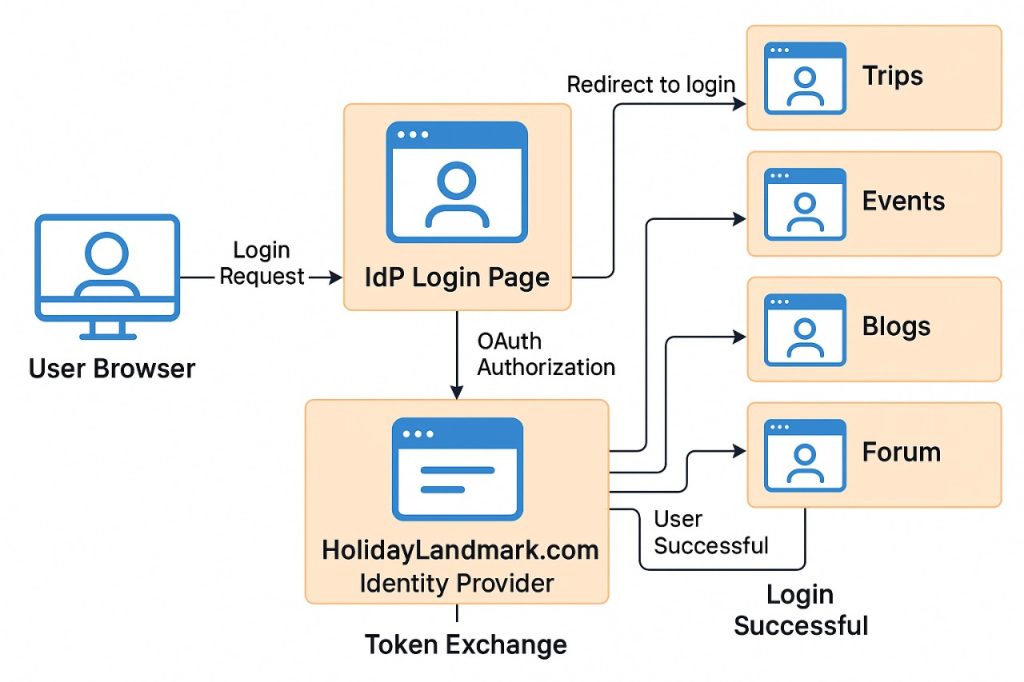
Let’s walk through the user journey:
- First Login: A user visits
HolidayLandmark.com/blogsand enters their credentials on the blog’s native login page. - API Call: JavaScript on the login page sends these credentials via an AJAX request to a secure endpoint on the IdP, for example,
https://HolidayLandmark.com/api/v1/login. - Authentication and Cookie: The IdP validates the credentials. If correct, it returns a success message and, most importantly, includes a
Set-Cookieheader in the response. This creates a session cookie (e.g.,hl_session_token) on the.holidaylandmark.comdomain. - Login Confirmation: The JavaScript on the blog’s login page receives the success response and redirects the user to their logged-in view on the blog. The user is now authenticated.
- Visiting Another Service: The user then navigates to
HolidayLandmark.com/trips. - Silent Verification: The
/tripsapplication is configured to check for thehl_session_tokencookie. It finds the cookie and makes a quick, server-to-server API call to the IdP (/api/v1/user) to verify the token’s validity. - Instant Access: The IdP confirms the token is valid and returns the user’s data. The
/tripsapplication instantly creates a local session for the user without requiring any action. The user is now logged in seamlessly.
This silent verification happens on every service the user visits, creating a unified and frictionless experience.
Step-by-Step Implementation Guide
Part 1: Configure the Central Identity Provider (IdP)
On your main HolidayLandmark.com Laravel application:
- Build API Endpoints: In
routes/api.php, create two essential endpoints:POST /api/v1/login: An open endpoint that accepts an email and password. On success, it authenticates the user and establishes the session that sets the shared cookie. This must be protected with rate limiting.GET /api/v1/user: A protected endpoint that requires a valid session cookie. It returns the authenticated user’s data. This is used by other services for silent verification.
- Enable Shared Domain Cookies: This is the most critical step. In
config/session.php, configure the session cookie to be available across the entire domain. php'domain' => env('SESSION_DOMAIN', '.holidaylandmark.com'), - Handle CORS: While likely not an issue on the same domain, ensure your
config/cors.phpis configured to allow requests from your services if they ever move to subdomains.
Part 2: Configure the Service Providers (SPs)
A. For the Laravel Applications (/trips, /events, /forum):
- Customize the Login Form: Build a standard login view. Use JavaScript (
fetchor Axios) to override the default form submission and send the credentials to the IdP’s/api/v1/loginendpoint. - Create a Session Middleware: Develop a new middleware and apply it to all authenticated routes. This middleware will:
- Check if the user has a local session. If so, proceed.
- If not, check for the presence of the
hl_session_tokencookie. - If the shared cookie exists, make a server-side API call to the IdP’s
/api/v1/userendpoint. - If the user data is returned, log the user in locally using
Auth::loginUsingId().
B. For the WordPress Blog (/blogs):
- Create a Custom Login Experience: Either build a custom page template for your login page or use a plugin that allows for custom login form logic.
- Implement JavaScript: Add JavaScript to your login page to send credentials to the IdP’s
/api/v1/loginendpoint, just like with the Laravel apps. - Add PHP for Silent Login: In a custom plugin or your theme’s
functions.phpfile, hook into an early WordPress action likeinit. This function will:- Check if a user is currently logged into WordPress.
- If not, check
$_COOKIEfor thehl_session_token. - If found, use PHP cURL to call the IdP’s
/api/v1/userendpoint. - If the API returns valid user data, use WordPress functions like
wp_set_current_user()andwp_set_auth_cookie()to programmatically log the user into WordPress.
Centralizing Logout
Logout must also be unified. When a user clicks “Logout” on any service, they should be redirected to a central logout URL on the IdP (e.g., HolidayLandmark.com/logout). This endpoint’s only job is to invalidate the session and instruct the browser to delete the shared .holidaylandmark.com cookie, ensuring the user is logged out from all services at once.

I’m Abhishek, a DevOps, SRE, DevSecOps, and Cloud expert with a passion for sharing knowledge and real-world experiences. I’ve had the opportunity to work with Cotocus and continue to contribute to multiple platforms where I share insights across different domains:
-
DevOps School – Tech blogs and tutorials
-
Holiday Landmark – Travel stories and guides
-
Stocks Mantra – Stock market strategies and tips
-
My Medic Plus – Health and fitness guidance
-
TrueReviewNow – Honest product reviews
-
Wizbrand – SEO and digital tools for businesses
I’m also exploring the fascinating world of Quantum Computing.
Best Cardiac Hospitals Near You
Discover top heart hospitals, cardiology centers & cardiac care services by city.
Advanced Heart Care • Trusted Hospitals • Expert Teams
View Best Hospitals