Here is a breakdown of the architecture for the Single Sign-On (SSO) and centralized authorization system for HolidayLandmark.com.
This architecture is designed to be a decoupled, centralized identity management system. It separates the responsibility of user authentication and authorization from your individual applications, which simplifies management, enhances security, and provides a seamless experience for your users.
Core Architectural Components
The architecture consists of three main parts:
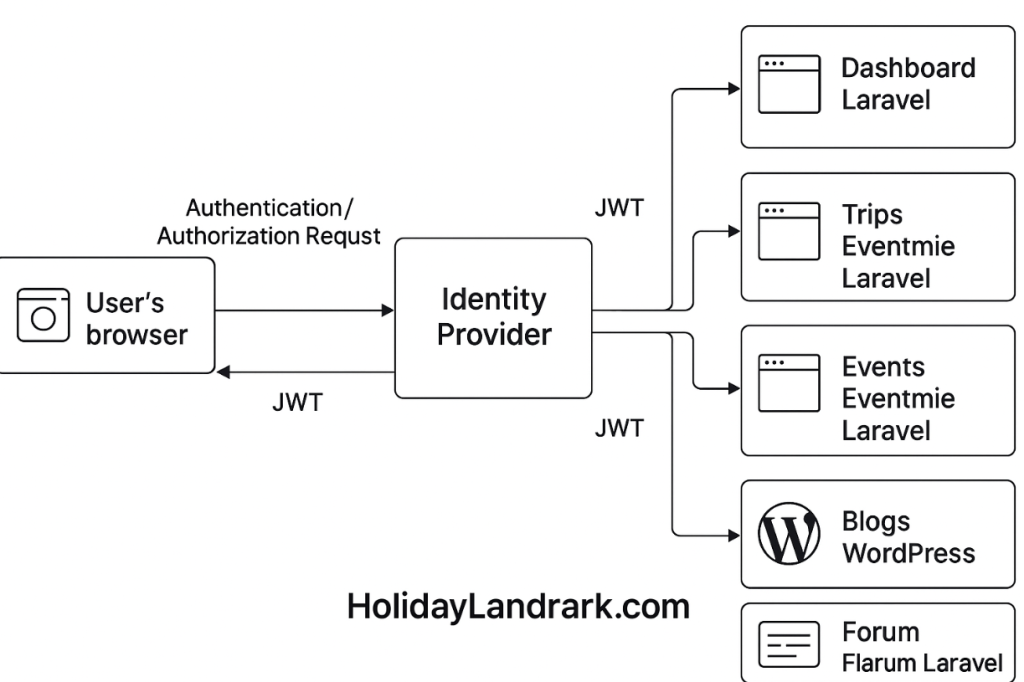
- Identity Provider (IdP): This is the central hub of your authentication system. It handles all user logins, manages user identities (usernames, passwords, profiles), and issues security tokens. For your
HolidayLandmark.comecosystem, this would be a single, dedicated service. - Service Providers (SPs): These are your individual applications that need to authenticate users. In your case, these are:
HolidayLandmark.com(Laravel Dashboard)HolidayLandmark.com/trips(Eventmie Laravel)HolidayLandmark.com/events(Eventmie Laravel)HolidayLandmark.com/blogs(WordPress)HolidayLandmark.com/forum(Flarum Laravel)
- User’s Browser: The user’s web browser acts as the intermediary, passing messages and redirection requests between the Service Providers and the Identity Provider.
The Authentication and Authorization Flow
Here is a step-by-step walkthrough of how a user logs in and accesses your applications within this architecture:
- Initial Access Attempt:
- A user navigates to one of your applications, for instance,
HolidayLandmark.com/trips. - The “Trips” application checks if the user is already logged in. Since it’s their first visit, they are not authenticated.
- A user navigates to one of your applications, for instance,
- Redirection to the Identity Provider (IdP):
- The “Trips” application (the SP) does not show its own login form. Instead, it redirects the user’s browser to your central Identity Provider (IdP).
- This redirection includes a request for authentication, identifying that the request originated from the “Trips” application.
- User Authentication at the IdP:
- The user sees the IdP’s login page and enters their single set of credentials (e.g., email and password).
- The IdP verifies these credentials against its central user database.
- The IdP also performs any necessary multi-factor authentication (MFA) at this stage.
- Token Generation and Redirection Back to the SP:
- Upon successful authentication, the IdP generates a JSON Web Token (JWT). This token is a secure, digitally signed package of information that includes:
- User identity (e.g., user ID, email).
- Authorization information (e.g., user roles like
Admin,Editorfrom your RBAC setup). - An expiration time for the session.
- The IdP then redirects the user’s browser back to the “Trips” application, including this JWT in the response.
- Upon successful authentication, the IdP generates a JSON Web Token (JWT). This token is a secure, digitally signed package of information that includes:
- SP Validates the Token and Grants Access:
- The “Trips” application receives the JWT. It validates the token’s digital signature to ensure it came from the trusted IdP and has not been tampered with.
- Once validated, the application establishes a session for the user and grants them access. The application can now use the roles inside the token to enforce permissions (e.g., allowing an
Adminto access a special dashboard).
- Seamless Access to Other Applications:
- Now, the user decides to visit the blog at
HolidayLandmark.com/blogs. - The WordPress blog (another SP) will also redirect the user to the IdP for authentication.
- However, the IdP recognizes that the user already has an active session and is authenticated.
- Instead of asking for a password again, the IdP immediately generates a new JWT for the WordPress application and sends the user back.
- The WordPress application validates this new token and logs the user in instantly, without any user interaction.
- Now, the user decides to visit the blog at
This entire process happens seamlessly in the background, providing the user with a true single sign-on experience across all of your web properties

I’m Abhishek, a DevOps, SRE, DevSecOps, and Cloud expert with a passion for sharing knowledge and real-world experiences. I’ve had the opportunity to work with Cotocus and continue to contribute to multiple platforms where I share insights across different domains:
-
DevOps School – Tech blogs and tutorials
-
Holiday Landmark – Travel stories and guides
-
Stocks Mantra – Stock market strategies and tips
-
My Medic Plus – Health and fitness guidance
-
TrueReviewNow – Honest product reviews
-
Wizbrand – SEO and digital tools for businesses
I’m also exploring the fascinating world of Quantum Computing.
Best Cardiac Hospitals Near You
Discover top heart hospitals, cardiology centers & cardiac care services by city.
Advanced Heart Care • Trusted Hospitals • Expert Teams
View Best Hospitals