A Complete Guide to Google Sign-In with Laravel: From Setup to Role-Based Redirects
Adding social login options can significantly improve the user experience of your application. Google Sign-In is a popular choice, offering a quick and secure way for users to register and log in. This guide provides a complete, step-by-step walkthrough for integrating Google Sign-In and Sign-Up into your Laravel project, including handling role-based redirection for different user types like admins, managers, and standard users.
Step 1: Install Laravel Socialite and Get Google Credentials
First, you need to add Laravel’s official package for social authentication and configure it with your API keys from Google.
Install Socialite
Open your project’s terminal and run the following Composer command to install the package:
composer require laravel/socialite
Get Google API Credentials
- Navigate to the Google Cloud Console.
- From the navigation menu, go to APIs & Services > Credentials.
- Click Create Credentials and select OAuth client ID.
- Choose Web application as the application type.
- Under Authorized redirect URIs, click ADD URI and enter the callback URL for your application. This must match the route you will create later. For example:
http://127.0.0.1:8000/auth/google/callback. - Click Create. Copy the generated Client ID and Client Secret for the next step.
Configure Laravel
Open your project’s .env file and add your Google credentials:
textGOOGLE_CLIENT_ID=your-google-client-id
GOOGLE_CLIENT_SECRET=your-google-client-secret
Next, open config/services.php and add the configuration for the google driver:
php'google' => [
    'client_id' => env('GOOGLE_CLIENT_ID'),
    'client_secret' => env('GOOGLE_CLIENT_SECRET'),
    'redirect' => env('APP_URL', 'http://127.0.0.1:8000') . '/auth/google/callback',
],
Step 2: Update the users Table
You need to modify your users table to store a unique Google ID for each user. It’s also best practice to make the password field optional, as users signing in via Google won’t have a traditional password.
Create a Migration
Generate a new migration file to alter the users table:
bashphp artisan make:migration add_google_id_to_users_table --table=users
Edit the Migration File
Open the new migration file located in database/migrations/. Modify the up() and down() methods to add the google_id column and make the password nullable.
phppublic function up(): void
{
    Schema::table('users', function (Blueprint $table) {
        $table->string('google_id')->nullable()->after('id');
        $table->string('password')->nullable()->change(); // Make password nullable
    });
}

public function down(): void
{
    Schema::table('users', function (Blueprint $table) {
        $table->dropColumn('google_id');
        $table->string('password')->nullable(false)->change(); // Revert on rollback
    });
}
Run the Migration
Apply the changes to your database by running the migrate command:
bashphp artisan migrate
Step 3: Create the Controller and Routes
The controller will manage the authentication flow: redirecting the user to Google and handling the callback data once the user approves the request.
Add the Routes
Open routes/web.php and add the two routes required for the redirect and callback logic.
phpuse App\Http\Controllers\Auth\GoogleAuthController;

Route::get('/auth/google', [GoogleAuthController::class, 'redirect'])->name('google.auth');
Route::get('/auth/google/callback', [GoogleAuthController::class, 'callback']);
Create the Controller
Generate the controller using this Artisan command:
bashphp artisan make:controller Auth/GoogleAuthController
Add the Controller Logic
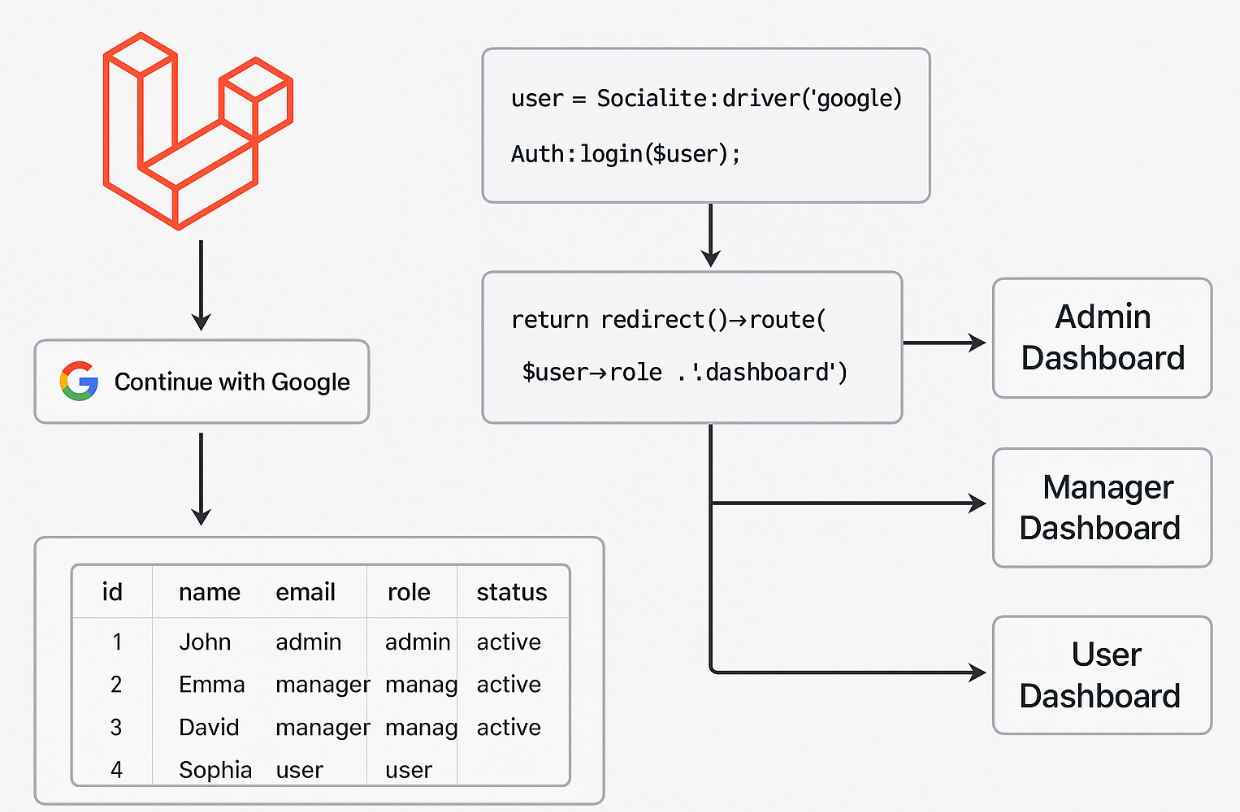
Open the newly created file at app/Http/Controllers/Auth/GoogleAuthController.php and add the following code. This logic handles new user creation, linking existing accounts, and redirecting users based on their assigned role.
php<?php

namespace App\Http\Controllers\Auth;

use App\Http\Controllers\Controller;
use App\Models\User;
use Illuminate\Support\Facades\Auth;
use Illuminate\Support\Facades\Hash;
use Illuminate\Support\Facades\Log;
use Illuminate\Support\Str;
use Laravel\Socialite\Facades\Socialite;

class GoogleAuthController extends Controller
{
    /**
     * Redirect the user to the Google authentication page.
     */
    public function redirect()
    {
        return Socialite::driver('google')->redirect();
    }

    /**
     * Obtain the user information from Google.
     */
    public function callback()
    {
        try {
            $googleUser = Socialite::driver('google')->user();

            // Check if a user with this email already exists
            $user = User::where('email', $googleUser->getEmail())->first();

            if ($user) {
                // If the user exists, link their Google ID if it's not already set
                $user->update(['google_id' => $googleUser->getId()]);
            } else {
                // If the user does not exist, create a new one with all required fields
                $user = User::create([
                    'name' => $googleUser->getName(),
                    'username' => strtolower(explode(' ', $googleUser->getName())[0]),
                    'email' => $googleUser->getEmail(),
                    'google_id' => $googleUser->getId(),
                    'email_verified_at' => now(),
                    'password' => Hash::make(Str::random(24)),
                    'role' => 'user', // Default role for new sign-ups
                    'status' => 'active' // Default status
                ]);
            }

            // Log the user in
            Auth::login($user);

            // Role-based redirection logic
            $role = Auth::user()->role;

            if ($role === 'admin') {
                return redirect('/admin/dashboard');
            } elseif ($role === 'manager') {
                return redirect('/manager/dashboard');
            } else { // Handles 'user' and any other roles
                return redirect('/user/dashboard');
            }

        } catch (\Exception $e) {
            Log::error('Google Sign-In Error: ' . $e->getMessage());
            return redirect('/login')->with('error', 'Something went wrong during Google Sign-In.');
        }
    }
}
Step 4: Update the User Model
To allow the controller to create users without running into mass assignment exceptions, you need to update the $fillable property in the User model.
Open app/Models/User.php and ensure the $fillable array includes all the fields you are setting in the controller.
phpprotected $fillable = [
    'name',
    'username',
    'email',
    'password',
    'google_id',
    'role',
    'status',
    'email_verified_at'
];
Step 5: Add the “Sign in with Google” Button
Finally, add a link or button to your login page that directs users to the Google authentication route you created.
In your login.blade.php file, or wherever your login form is located, add the following link:
xml<!-- In your login.blade.php file -->
<div>
    <button type="submit" class="btn btn-primary me-2 mb-2 mb-md-0 text-white">
        {{ __('Log in') }}
    </button>

    <!-- SIGN IN WITH GOOGLE BUTTON -->
    <a href="{{ route('google.auth') }}" class="btn btn-outline-danger">
        <i data-feather="link" class="me-2"></i> Sign in with Google
    </a>
</div>
Conclusion
That’s it! Your Laravel application is now fully configured to allow users to sign up and log in with their Google accounts. This implementation gracefully handles both new and existing users and automatically redirects them to the correct dashboard based on their role, creating a seamless and secure authentication flow.

I’m Abhishek, a DevOps, SRE, DevSecOps, and Cloud expert with a passion for sharing knowledge and real-world experiences. I’ve had the opportunity to work with Cotocus and continue to contribute to multiple platforms where I share insights across different domains:
-
DevOps School – Tech blogs and tutorials
-
Holiday Landmark – Travel stories and guides
-
Stocks Mantra – Stock market strategies and tips
-
My Medic Plus – Health and fitness guidance
-
TrueReviewNow – Honest product reviews
-
Wizbrand – SEO and digital tools for businesses
I’m also exploring the fascinating world of Quantum Computing.
Best Cardiac Hospitals Near You
Discover top heart hospitals, cardiology centers & cardiac care services by city.
Advanced Heart Care • Trusted Hospitals • Expert Teams
View Best Hospitals