here’s a beginner-friendly version of the guide you shared on Zero Downtime Deployment using PHP Deployer for Laravel projects. It’s written to help learners easily understand and follow the process without feeling overwhelmed:
🚀 Zero Downtime Deployment for Laravel Using PHP Deployer – A Beginner’s Guide
✅ What is Zero Downtime Deployment?
Imagine updating your website without any interruptions — users stay online, no glitches, no downtime. That’s zero downtime deployment.
It means:
- Your users won’t notice when you’re deploying updates.
- Your website or app stays online all the time, even while new code is being uploaded.
This is usually done through smart strategies like:
- Blue-Green Deployments
- Canary Releases
- Rolling Updates
These techniques help push updates slowly, keeping the old version alive until the new one is ready and stable.
💡 Why It’s Easier with PHP
PHP is an interpreted language, which means:
- No need to compile.
- You can switch between code versions using tricks like symlinks (symbolic links) without restarting the whole server.
But, for a proper professional deployment, you still need to:
- Run database migrations
- Clear caches
- Build frontend assets
- Restart services (if needed)
To help with all that, let’s meet the hero of this guide: PHP Deployer!
🧰 What is PHP Deployer?
PHP Deployer (also called just “Deployer”) is a tool to automate the deployment of PHP apps.
With Deployer, you can:
- Deploy to one or more servers
- Run tasks like building assets or migrating databases
- Manage releases easily
It even comes with built-in support (recipes) for popular frameworks — like Laravel!
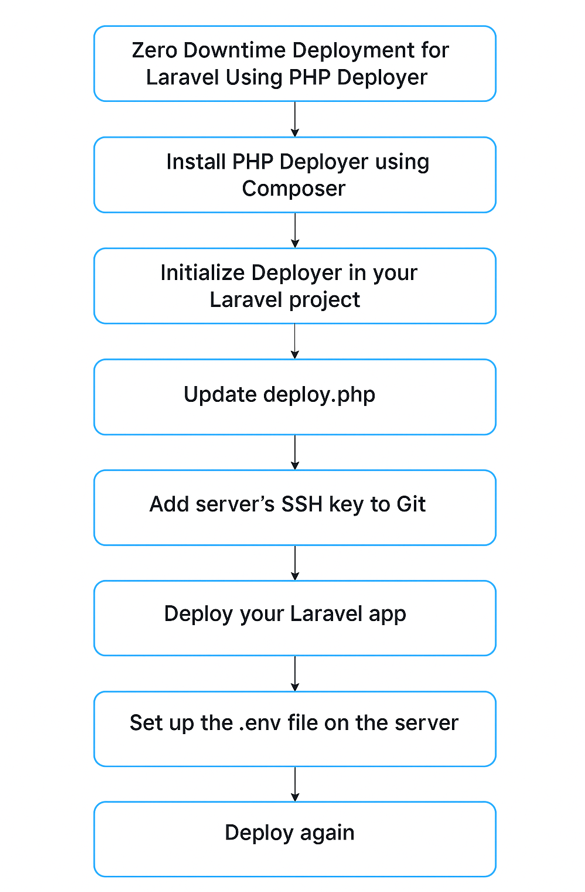
🛠️ Step-by-Step: Zero Downtime Deployment for Laravel
Let’s get started.
Step 1: Install PHP Deployer
In your Laravel project, open a terminal and run:
composer require --dev deployer/deployer
This installs Deployer as a development tool in your project.
Step 2: Initialize Deployer
Now run:
vendor/bin/dep init
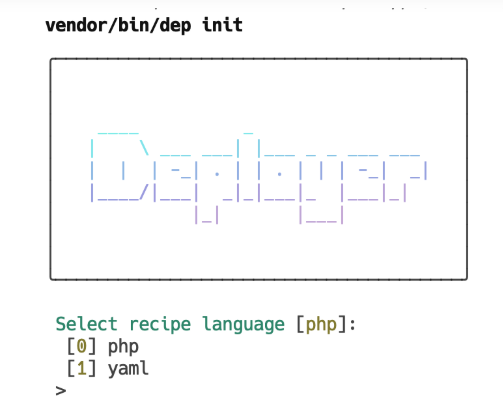
This sets up Deployer in your Laravel app.
Step 3: Answer Setup Questions
During setup, Deployer will ask:
- File format – Just press Enter to choose the default (
PHP). - Choose a recipe – Select
Laravel. - Enter Git repo URL – Paste your GitHub or GitLab project URL.
- Project name – Name your project anything you like.
- Host IP/Domain – Enter your server IP or hostname.
- Confirm setup – Hit Enter.
After this, a file named deploy.php will be created in your project.
Step 4: Update deploy.php
Your deploy.php will look like this:
<?php
namespace Deployer;

require 'recipe/laravel.php';

set('repository', 'https://github.com/your-repo.git');

host('your.server.ip')
    ->set('remote_user', 'your-ssh-user')
    ->set('deploy_path', '~/your-project-path');

after('deploy:failed', 'deploy:unlock');
- Replace the repository URL, user, and path with your actual info.
- This tells Deployer how to connect to your server and where to deploy the code.
Step 5: If You’re Using Vite (for Laravel Mix)
Laravel uses Vite for frontend asset building. So, add this to your deploy.php:
desc('Install & build npm packages');

task('npm:build', function () {
    run('cd {{release_path}} && npm ci && npm run build');
});

after('artisan:migrate', 'npm:build');
This ensures your JS/CSS files get built after the migration step.
Step 6: Add Server’s SSH Key to Git
Your server needs permission to pull your code from Git.
To do that:
- SSH into your server
- Run this to view the public key:
cat ~/.ssh/id_rsa.pub
- Copy the output.
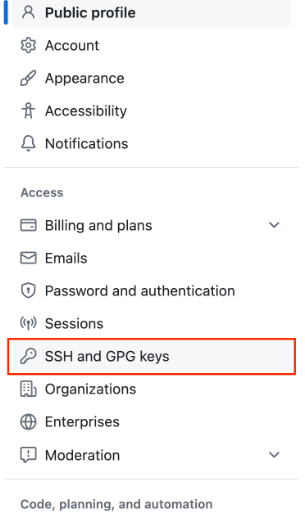
- Go to your Git repo → Settings → SSH and GPG Keys
- Click “New SSH Key”, paste the copied key, and save.
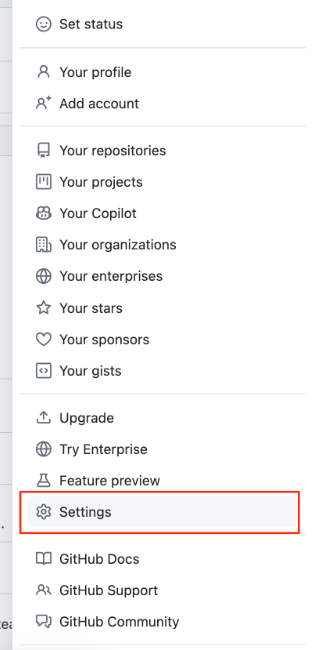
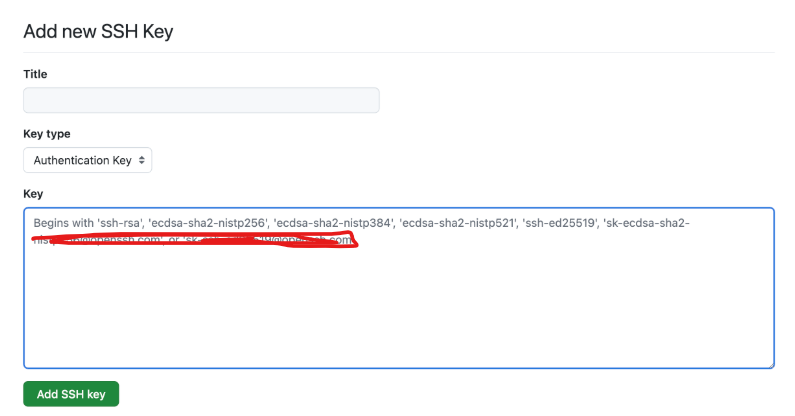
Now your server can pull your code securely.
Step 7: Deploy Your Laravel App
Back in your project folder on your local machine, run:
vendor/bin/dep deploy
During the first deployment, you might see:
Warning: Your .env file is empty! Skipping...
No worries! We’ll fix that next.
Step 8: Set Up the .env File on the Server
You only need to do this once:
- SSH into your server:
vendor/bin/dep ssh
- Copy the example
.envfile to the shared folder:
cp .env.example ../../shared/.env
- Open it and edit values as needed:
nano ../../shared/.env
Make sure APP_ENV=production
- If needed, generate a new key:
php artisan key:generate
- Exit the SSH session:
exit
Step 9: Deploy Again
Now that your .env is set, run the deploy again:
vendor/bin/dep deploy
🎉 That’s it! Your Laravel project is now deployed with zero downtime.
🔁 How It Works Behind the Scenes
- Every time you deploy, Deployer creates a new folder (
release) for that version. - Then, it symlinks that folder to the
currentdirectory. - Your web server always points to
current, so switching versions is smooth and instant.
✅ Benefits of This Approach
- No downtime.
- Easy rollbacks.
- Smooth experience for users.
- Cleaner deployment workflow for developers.
🎉 Final Thoughts
Zero downtime deployment sounds fancy, but with tools like PHP Deployer, it’s easy and powerful.
Just install it, set up your deploy config, connect your server, and you’re good to go. This is one of the best ways to scale your Laravel apps professionally and deliver updates without annoying your users.

I’m Abhishek, a DevOps, SRE, DevSecOps, and Cloud expert with a passion for sharing knowledge and real-world experiences. I’ve had the opportunity to work with Cotocus and continue to contribute to multiple platforms where I share insights across different domains:
-
DevOps School – Tech blogs and tutorials
-
Holiday Landmark – Travel stories and guides
-
Stocks Mantra – Stock market strategies and tips
-
My Medic Plus – Health and fitness guidance
-
TrueReviewNow – Honest product reviews
-
Wizbrand – SEO and digital tools for businesses
I’m also exploring the fascinating world of Quantum Computing.
Best Cardiac Hospitals Near You
Discover top heart hospitals, cardiology centers & cardiac care services by city.
Advanced Heart Care • Trusted Hospitals • Expert Teams
View Best Hospitals