Best Cosmetic Hospitals Near You

Compare top cosmetic hospitals, aesthetic clinics & beauty treatments by city.

Trusted • Verified • Best-in-Class Care

Explore Best Hospitals

Resolving Host Key Verification Issue with GitHub SSH

When cloning a GitHub repository via SSH, you might encounter an error related to host key verification. This guide will walk you through resolving this issue and successfully cloning the repository.

ERROR:

root@Abhishek:/opt/lampp/htdocs# git clone git@github.com:holidaylandmark/holidaylandmark-demo-2.git
Cloning into 'holidaylandmark-demo-2'...
The authenticity of host 'github.com (20.207.73.82)' can't be established.
ED25519 key fingerprint is SHA256:+DiY3wvvV6TuJJhbpZisF/zLDA0zPMSvHdkr4UvCOqU.
This key is not known by any other names
Are you sure you want to continue connecting (yes/no/[fingerprint])?
Host key verification failed.
fatal: Could not read from remote repository.

Please make sure you have the correct access rights
and the repository exists.

Solution:

Note:

Use Git bash Terminal to do this

Step 1: Verify SSH Key Setup

  1. Open Terminal: Launch your terminal application on your system.
  2. Check for Existing SSH Keys: Run the following command to see if you have existing SSH keys:
   ls -al ~/.ssh

Look for files named id_rsa and id_rsa.pub (or similar). If these files are not present, you will need to generate a new SSH key.

Step 2: Generate SSH Key (if not existing)

  1. Generate a New SSH Key: If you don’t have an SSH key, generate one using the following command:
   ssh-keygen -t ed25519 -C "your_email@example.com"
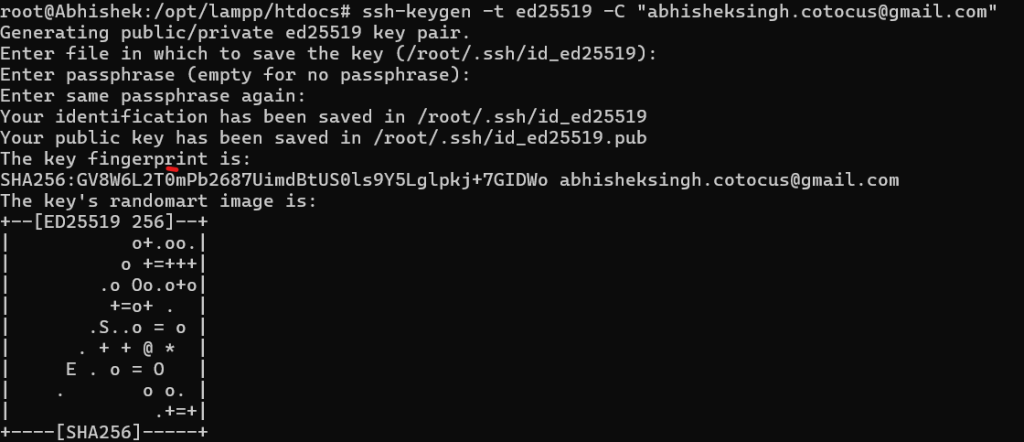
  • When prompted, press Enter to accept the default file location.
  • Choose a passphrase or leave it empty if you prefer.

Step 3: Add SSH Key to SSH Agent

  1. Start the SSH Agent: Run the following command to start the SSH agent in the background:
   eval "$(ssh-agent -s)"
  1. Add Your SSH Key to the Agent: Add your SSH private key to the agent using this command:
   ssh-add ~/.ssh/id_ed25519

Step 4: Add SSH Key to Your GitHub Account

  1. Copy SSH Public Key to Clipboard: Use the following command to copy your SSH public key:
   cat ~/.ssh/id_ed25519.pub

Copy the output to your clipboard.

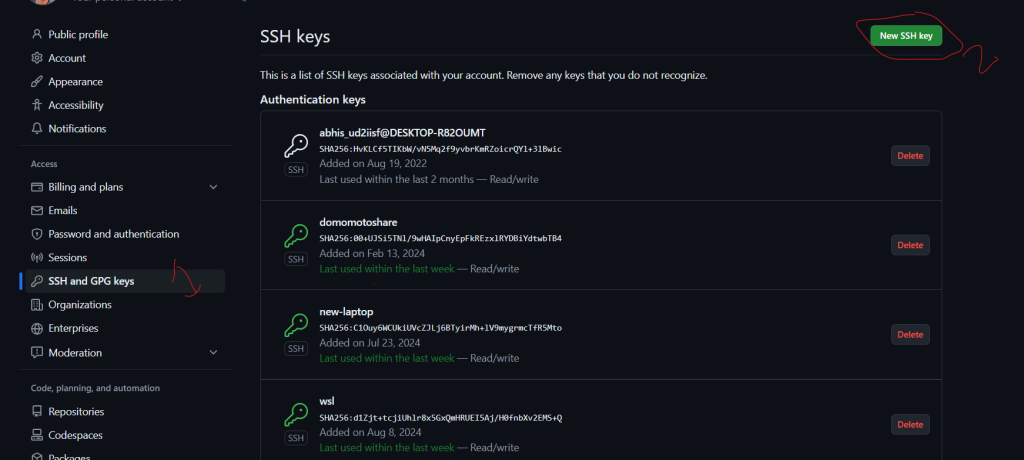
  1. Add SSH Key to GitHub:
  • Log in to your GitHub account.
  • Navigate to GitHub’s SSH and GPG keys settings.
  • Click “New SSH key”.
  • Give your key a title and paste your SSH public key into the “Key” field.
  • Click “Add SSH key”.

Step 5: Update Known Hosts File

  1. Automatically Add GitHub to Known Hosts: Run the following command to add GitHub’s SSH key to your known hosts file:
   ssh-keyscan github.com >> ~/.ssh/known_hosts

Step 6: Clone the Repository

  1. Retry Cloning the Repository: Now that your SSH setup is complete, try cloning the repository again:
   git clone "your repo name"

If all steps were followed correctly, the repository should clone successfully without any host key verification issues.

By following this tutorial guide, you should be able to resolve host key verification issues and clone a GitHub repository using SSH. If you encounter further issues, ensure you have the necessary permissions to access the repository on GitHub.

Best Cardiac Hospitals Near You

Discover top heart hospitals, cardiology centers & cardiac care services by city.

Advanced Heart Care • Trusted Hospitals • Expert Teams

View Best Hospitals
<p data-start="140" data-end="435">I’m Abhishek, a DevOps, SRE, DevSecOps, and Cloud expert with a passion for sharing knowledge and real-world experiences. I’ve had the opportunity to work with <a class="decorated-link" href="https://www.cotocus.com/" target="_new" rel="noopener" data-start="300" data-end="335">Cotocus</a> and continue to contribute to multiple platforms where I share insights across different domains:</p> <ul data-start="437" data-end="922"> <li data-start="437" data-end="514"> <p data-start="439" data-end="514"><a class="decorated-link" href="https://www.devopsschool.com/" target="_new" rel="noopener" data-start="439" data-end="485">DevOps School</a> – Tech blogs and tutorials</p> </li> <li data-start="515" data-end="599"> <p data-start="517" data-end="599"><a class="decorated-link" href="https://www.holidaylandmark.com/" target="_new" rel="noopener" data-start="517" data-end="569">Holiday Landmark</a> – Travel stories and guides</p> </li> <li data-start="600" data-end="684"> <p data-start="602" data-end="684"><a class="decorated-link" href="https://www.stocksmantra.in/" target="_new" rel="noopener" data-start="602" data-end="647">Stocks Mantra</a> – Stock market strategies and tips</p> </li> <li data-start="685" data-end="764"> <p data-start="687" data-end="764"><a class="decorated-link" href="https://www.mymedicplus.com/" target="_new" rel="noopener" data-start="687" data-end="732">My Medic Plus</a> – Health and fitness guidance</p> </li> <li data-start="765" data-end="841"> <p data-start="767" data-end="841"><a class="decorated-link" href="https://www.truereviewnow.com/" target="_new" rel="noopener" data-start="767" data-end="814">TrueReviewNow</a> – Honest product reviews</p> </li> <li data-start="842" data-end="922"> <p data-start="844" data-end="922"><a class="decorated-link" href="https://www.wizbrand.com/" target="_new" rel="noopener" data-start="844" data-end="881">Wizbrand</a> – SEO and digital tools for businesses</p> </li> </ul> <p data-start="924" data-end="1021">I’m also exploring the fascinating world of <a class="decorated-link" href="https://www.quantumuting.com/" target="_new" rel="noopener" data-start="968" data-end="1018">Quantum Computing</a>.</p>

Related Posts

Mastering Multiple PHP Versions on Ubuntu: A Comprehensive Guide

Using multiple PHP versions on Ubuntu is straightforward, as Ubuntu allows you to install multiple versions of PHP side by side. You can switch between them using…

Read More

How to Upgrade PHP 8.1 to PHP 8.2 on Ubuntu: A Step-by-Step Guide

Certainly! Here’s a comprehensive guide on how to upgrade PHP from version 8.1 to 8.2 on an Ubuntu system Upgrading PHP to the latest version is crucial…

Read More

How to Resolve “netstat: command not found” Error When Restarting XAMPP on Linux

Introduction While working with XAMPP on Linux, you might encounter the following error message when trying to restart the XAMPP services: This error occurs because the netstat…

Read More

How to Downgrade PHP Version on Ubuntu: Step-by-Step Guide

Downgrading the PHP version on an Ubuntu server involves several steps. Below is a detailed guide on how to achieve this: Step 1: Check the Current PHP…

Read More

XAMPP: Another web server daemon is already running

Error: root@ip-112-21-1-80:/opt/lampp# sudo /opt/lampp/lampp stopStopping XAMPP for Linux 8.2.4-0…XAMPP: Stopping Apache…not running.XAMPP: Stopping MySQL…ok.XAMPP: Stopping ProFTPD…ok. Solution: The error message you’re seeing indicates that there’s already a web…

Read More

Error: Netstat: command not found Fail

Error:ubuntu@ip-112-21-45-62:~$ sudo /opt/lampp/Lampp start Starting XAMPP for Linux 8.2.4-0… KAMPP: Starting Apache… /opt/lampp/share/xampp/xampplib: line 22: netstat: command not found opt/lampp/share/xampp/xampplib: line 22: netstat: command not found Fail….

Read More
0 0 votes
Article Rating
Subscribe
Notify of
guest
0 Comments
Oldest
Newest Most Voted
Inline Feedbacks
View all comments
0
Would love your thoughts, please comment.x
()
x